Using Boot Camp Assistant to install Windows on a Mac
BootCamp Installer
-
Download appropriate Windows 10 .iso from Dropbox HERE.Note: As of Sept 27, 2019, Windows 10 1803 is the newest version of Windows you can use with BootCamp. You’ll have to update it to the newest version once it’s installed.
-
Launch ‘Boot Camp Assistant’ on the Mac.
-
Hit ‘Continue’ at the Introduction screen
-
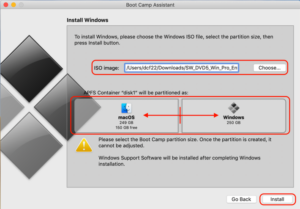
At the next screen, choose the Windows ISO you downloaded, choose the size of the Windows partition, and then hit ‘Install.’ Choose wisely, because you cannot resize the partition once it’s been made.
-
On loaners, it’s good to make it 50/50 Mac/Windows.
-
On lab machines and user machines, check with the user before choosing the size of the Windows partition. Some users only use Windows, even on a Mac, and some just need a small Windows partition so they can go into windows on occasion to test something.
-
-
Boot Camp Assistant will start downloading the Windows support software.Note: Apple’s servers are a little horrible, so you may have to go through these steps a couple of times before BCA finally downloads and installs the Windows Support Software. Once it gets done with this step, it will partition the disk, copy the Windows files, and restart.
-
Once the Mac restarts, follow the normal Windows installation setup procedure in Evernote found here, setting the computer up and installing the appropriate software. You won’t be able to enable encryption on a BootCamp partition, and you most likely won’t need to add it to the domain, but you should Check with IT staff if you think you need to add it to the domain.
-
After the normal Windows installation, Boot Camp Installer will install Boot Camp software in Windows. Click Yes / Accept / etc. to install.
-
If the user will be dual-booting Mac and Windows, you’ll want to install BootRunner following the instructions here.